How to Fix 0x4005 (16389) Error When Upgrading Windows?
Windows upgrades are almost like the necessary evil in most modern-day computing. They help keep your system equipped with the latest technology and provide free security patches, but what happens when you run into an error while upgrading?
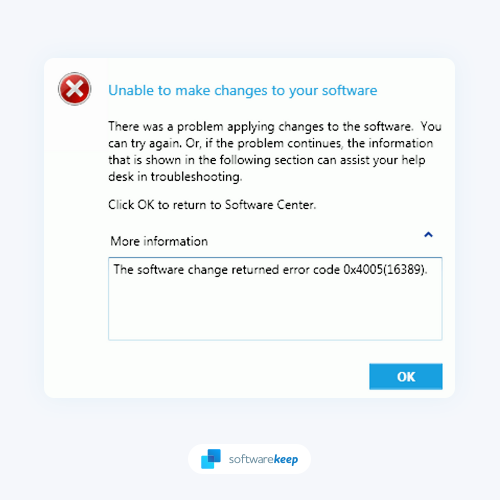
Many users see this 0x4005 (16389) message stopping them from completing their installation process.
It's true that Windows upgrades can be a headache, especially when you encounter this error. But don't worry – we're here to help!
In this post, we'll show you how to fix error code 0x4005 (16389) when upgrading Windows. Keep reading for more information.
What Causes Error Code 0x4005 (16389) on Windows?
When executing an in-place upgrade to Windows 10 or Windows 11, users may get the error code 0x4005 (16389) when the upgrade fails. When one or more apps are incompatible with Windows 10, the upgrading procedure fails and the error code shows.
However, depending on your situation, there could be a number of reasons why the mentioned error code appears:
- Not enough available disk space - One of the reasons you can run into this issue is that you don't have enough disk space for the upgrade. When this happens, double-check your disk space before continuing with the upgrade job sequence.
- Different Windows versions – It turns out that some users' problems were caused by their decision to switch to a different Windows edition rather than their current one. This could result in an error code, and you'll need to make sure you upgrade to the same edition to fix the problem.
- Third-party antivirus - If you have a third-party antivirus application installed, it may prevent the upgrade from being completed successfully, resulting in the issue. As a result, you'll need to disable it or uninstall the third-party security product from your computer.
- Local Computer Description - If you set the computer description during the job sequence, the script or command may fail, resulting in an error code. Use the command we'll offer below to repair this, and you should be ready to go.
We can only discuss the basic reasons for the problem and what typically leads to the error code in question.
In certain circumstances, the error code may be extremely particular to you, and in that case, speaking with a technical support representative may be the best option.
Fix Windows Upgrade Failed Error Code 0x4005 (16389)
If you have run into the issue, there are a few steps you can take to try and fix it. These steps may not work for everyone, but they're certainly worth a try if you're stuck on error code 0x4005 (16389).
Method 1. Check if You Have Enough Disk Space
As we briefly mentioned above, not having enough disk space is one of the reasons you can run into this problem while upgrading Windows. So, before you do anything else, check your computer to see if there's enough free space.
To do this in Windows 10, go to "This PC" and look at the main drive (usually called "Local Disk (C:)"). Right-click it and select "Properties."
Under the "General" tab, you'll see how much space is available. If it says there are less than 20 GB of free space, the OS deployment will fail during the upgrade process.
So, if you have insufficient space on your disk, follow these tips for you so you can have the required disk space for the upgrade process:
- Uninstall apps you don't use anymore.
- Empty your Recycle Bin.
- Delete temporary files.
- Remove any non-essential data from your storage drives.
- Defragment your drives.
Once you've done all of the above and freed up some space on your operating systems, restart your computer and try upgrading Windows again.
Method 2. Temporarily Disable Third-Party Antivirus Programs
If you have a third-party antivirus program installed, it may be the reason you're encountering this problem. The solution is to temporarily disable the security software and then try upgrading Windows again.
Of course, this means your computer will be vulnerable during that time, so make sure you re-enable the security software as soon as the upgrade is finished.
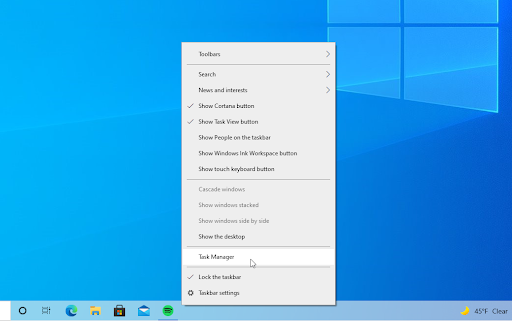
- Right-click on an empty space in your taskbar and choose Task Manager from the context menu.
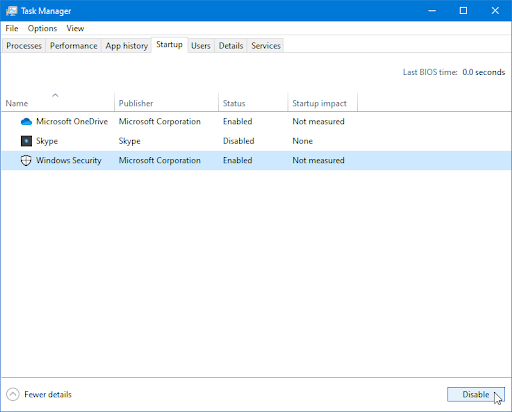
- Switch to the Startup tab using the header menu located at the top of the window. Here, find your antivirus application from the list and select it by clicking on it once.
- Click on the Disable button now visible in the bottom-right of the window. This will disable the application from launching when you start your device.
- Restart your computer and see if you’re able to upgrade Windows.
Method 3. Use the Same Version of Windows To Upgrade
The problem is that the error code was entered incorrectly, which means it might happen when you're using a different Windows edition than the one currently installed on your computer.
It's been reported by other users who were having similar difficulties and discovered that correcting the problem involved selecting the same Windows media like them.
To avoid this, you must make sure that the same Windows media is being used as the one you have already installed.
This implies that if you have Windows Enterprise installed, you should use Windows Enterprise media while upgrading to avoid receiving an error code.
Method 4. Change the Local Computer Description Command
If you see the error code while using a job sequence, it may be because you set the computer description during the job sequence. You'll need to change the command used to set the local computer description to fix this.
This can be done with the NET CONFIG command. Simply add Run Command-Line to the task sequence and then run the command:
|
cmd /c net config Server /SRVCOMMENT:"%OSDComputerDescription% |
This will change the computer description to the OSDComputerDescreitpion variable's value. You can alter the variable name to whatever you want to make it work for you.
Method 5. Uninstall Program As 32-Bit Process on 64-Bit Computers
If you're getting error 0x4005 (16389) while attempting to deploy a .NET framework across machines, simply check a certain box in the installer's settings to fix it.
The problem may occur when you have the program running as a 32-bit process on a 64-bit computer system.
- To begin, open the installer or deployment properties for the .NET version you want to deploy.
- Switch to the Program tab in the properties window.
- Then, on the Program tab, tick the box that says "Run installation and uninstall programs as 32-bit process on 64-bit clients."
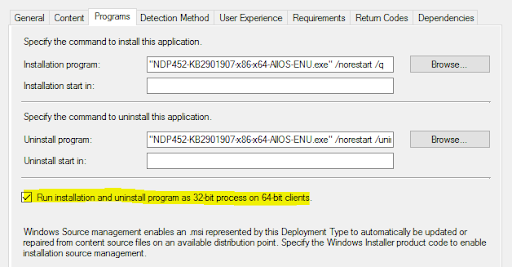
- Finally, tap OK after clicking Apply. Try deploying it again after that to check if the problem still exists.
TL;DR
Here are some ways you can resolve error code 0x4005 (16389):
- Restart your computer! This is always a good starting point when troubleshooting any computer issue. More often than not, a simple restart will fix the problem.
- If you have insufficient disk space, make sure to create the required disk space for the update. You can delete applications or files you no longer need until there's enough disk space freed to install the upgrade.
- Your third-party antivirus program can sometimes interfere with upgrades and prevent them from being completed successfully. Try temporarily disabling any third-party antivirus program to see if that fixes the problem.
- If you have any previous Windows installation files taking up space on your computer, try deleting them. This could free up enough space for the upgrade to be completed successfully.
- Repair Local Computer Description. The Local Computer Description can sometimes cause problems during an upgrade.
Conclusion
While the process of upgrading Windows may seem daunting, it's important to keep your system up-to-date. In this article, we've provided some tips on how to fix error code 0x4005 (16389) when installing Windows updates or performing an in-place upgrade.
We hope you found these solutions helpful for the long error message mentioned earlier. If you still can't seem to resolve the issue, make sure to contact us or reach out to Microsoft support for more help!
One More Thing
Looking for more tips? Check out our other guides in our Blog or visit our Help Center for a wealth of information on how to troubleshoot various issues.
Sign up for our newsletter and get early access to our blog posts, promotions, and discount codes. Plus, you'll be the first to know about our latest guides, deals, and other exciting updates!
Recommended Articles
» In-Place Upgrade Windows Server 2008 R2 to Windows Server 2022
» How to Fix Windows Update Stuck on Download after Windows 10 Upgrade
» Windows Server 2019 In-Place Upgrade Expert Guide
Feel free to reach out with questions or requests you’d like us to cover.
About the Author